Black Line on Laptop Screen: Causes and How to Fix It
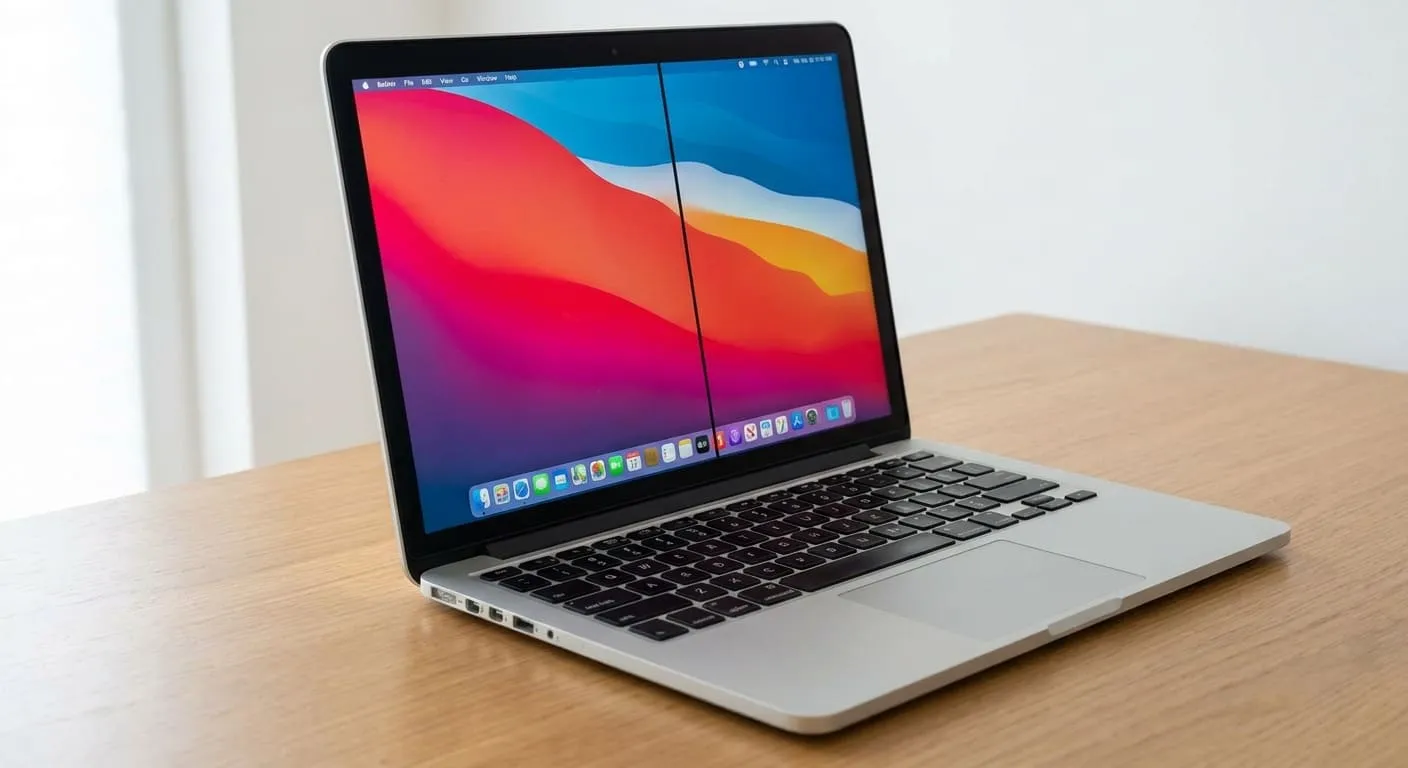
A black line on a laptop screen usually points to a problem with the display panel, its cable or connection, or the software responsible for rendering the image. The good news is that the shape, position, and behavior of the line can provide useful clues about which one you are dealing with.
This guide walks through what typically causes a black line on a laptop screen, how to test whether the problem is software or hardware, and what to do once you know the cause. Horizontal lines, vertical lines, and multiple lines across the display are covered separately, since each pattern points toward slightly different causes.
What Causes Black Lines on Laptop Screen?
Most black lines trace back to one of two broad categories: a physical problem with the display panel or its connection, or a problem with how Windows and the graphics system are rendering the image. Knowing the common causes in each category makes the diagnostic steps later in this guide much easier to follow.
Physical display or hardware causes
- Damaged LCD or OLED panel. A cracked, pressed, or aging panel can develop dead rows or columns of pixels that show up as a solid black line.
- Loose or damaged display cable. The thin ribbon cable that connects the screen to the motherboard runs through the hinge. Repeated opening and closing can wear it down or partially disconnect it.
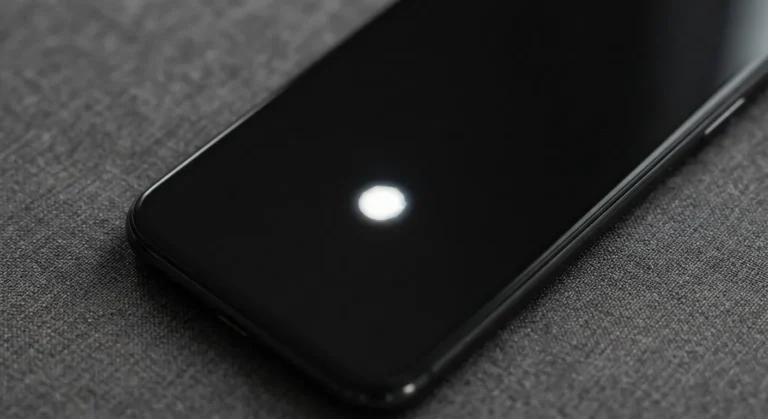
- Pressure or impact damage. Carrying a laptop in a tight bag, sitting on it, or dropping it can stress the panel even without visible cracking. While this type of physical stress usually creates dead rows of pixels on a laptop LCD, similar pressure on smaller devices often shows up as bright patches or pressure marks on a phone screen.
- Hinge-related cable strain. On laptops where the cable bends sharply near the hinge, normal use over a year or two can pinch or fray it.
- Manufacturing defects. Occasionally a panel leaves the factory with a weak spot that fails early, sometimes still under warranty.
Software and driver causes
- Outdated or corrupted graphics drivers. A driver that is out of sync with a recent Windows update can misrender parts of the screen.
- Incorrect resolution or refresh rate. A resolution or refresh rate the panel does not fully support can produce a line, band, or flicker.
- GPU rendering glitches. Overheating or an unstable graphics card can occasionally cause visual artifacts that resemble a line.
- Overheating. Sustained high temperatures can affect both the GPU and, in rare cases, the display connection.
- Moisture exposure. Even a small amount of liquid near the screen bezel can damage the panel or its connector over time.
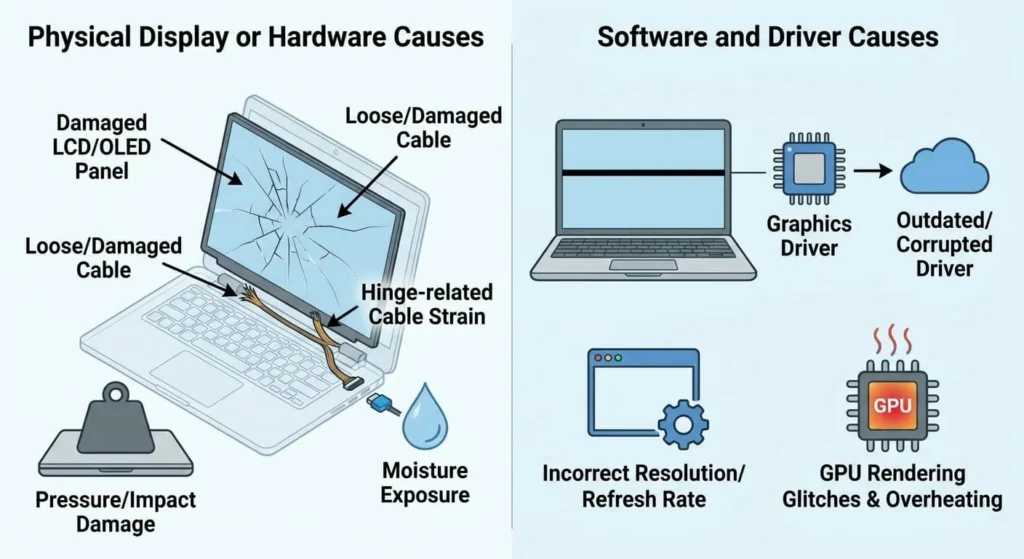
The general rule is this: if the line follows the screen everywhere, including in BIOS and on the Windows lock screen, it is almost always hardware. If it only appears inside certain apps or after specific updates, software is a more likely starting point.
How to Diagnose a Black Line on a Laptop Screen
Before trying any fix, it helps to isolate what is actually causing the line. These checks take a few minutes and narrow down whether you are dealing with a display panel issue, a cable problem, or a driver problem.
Restart the Laptop
A full restart clears temporary rendering glitches and reloads the graphics driver from scratch. If the line disappears after a restart, the cause is more likely software than hardware, though it is worth continuing to watch for it.
Check the Screen in BIOS or UEFI
If the black line is visible in BIOS or UEFI, the problem is very likely hardware-related because Windows and its graphics drivers have not loaded yet. This makes the display panel, cable, connector, or related hardware more likely to be responsible.
Connect an External Monitor
Plug the laptop into an external display using HDMI or USB-C. If the external screen is clean, the laptop’s internal panel or its cable is the likely source. If the same line appears on the external display, the laptop’s graphics card deserves a closer look, or you may be dealing with a separate black line on your monitor.
Take a Screenshot
Press Windows key + Shift + S, or the standard screenshot shortcut for your laptop, and save the image. If the line appears in the saved screenshot, it was captured by Windows or the graphics pipeline, making a software or GPU-rendering problem more likely. If the screenshot looks clean while you can still see the line on the physical screen, the problem is more likely to be with the display panel or connection.
Run a Full-Screen Color Test
Sometimes, what looks like a physical hardware line is actually a cluster of dead or stuck pixels that only appear under certain rendering conditions. Running a full-screen color diagnostic helps you spot exactly where the panel is failing and whether the line persists across different color spectrums. You can quickly check this using our free Online Screen Test Tool to cycle through solid backgrounds and pinpoint display defects before attempting hardware repairs.
Move the Laptop Lid Slowly
With the laptop powered on, gently tilt the lid back and forth a few degrees while watching the line. If it shifts, flickers, or changes thickness as the lid moves, that is a strong sign of a loose or stressed display cable near the hinge.
Check When the Line First Appears
Think back to whether the line showed up after a Windows update, a driver update, a drop or bump, or with no clear trigger at all. This timing often lines up closely with either a software cause or a hardware one.
Signs the Problem Is Hardware-Related
Certain signs make a hardware cause far more likely than a software one:
- The line remains after a full restart and after driver reinstallation
- The line appears in BIOS or UEFI, before Windows loads
- The line does not change after updating or rolling back graphics drivers
- The line shifts or flickers when the lid is moved
- The line appeared shortly after dropping, pressing, or sitting on the laptop
- Multiple lines have appeared and are increasing over time
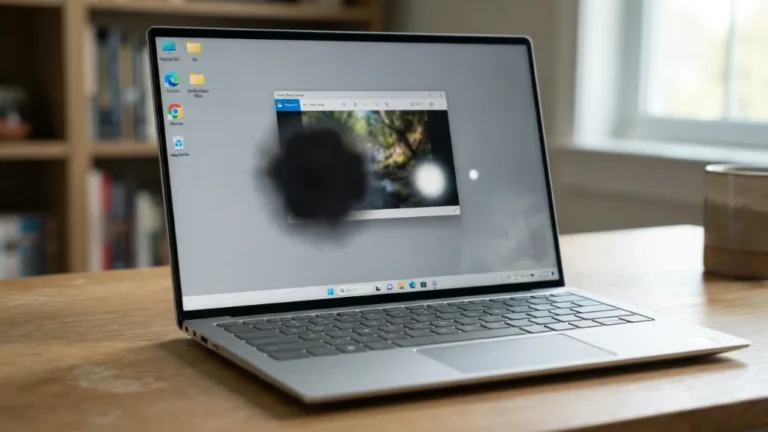
- The screen shows visible cracks, pressure marks, or unusually dark patches near the line
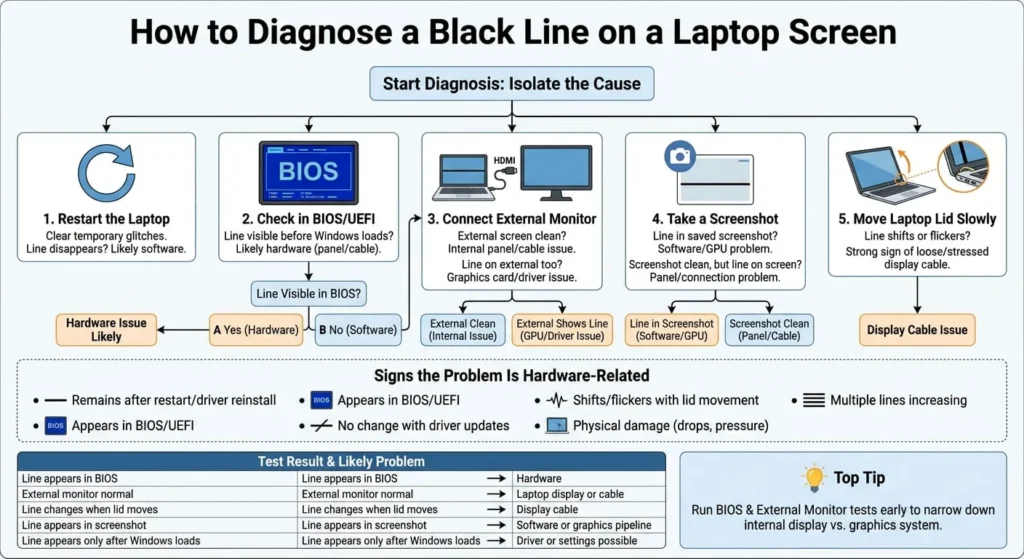
If two or more of these apply, it is reasonable to treat the issue as hardware and start looking into repair or replacement rather than continuing to chase software fixes.
My Top Tip:
Run the BIOS check and external monitor test early in the troubleshooting process. Together, these tests can quickly narrow down whether the problem is coming from the internal display assembly or the graphics system, often within a few minutes.
| Test result | Likely problem |
| Line appears in BIOS | Hardware |
| External monitor is normal | Laptop display or cable |
| Line changes when lid moves | Display cable |
| Line appears in screenshot | Software or graphics pipeline |
| Line appears only after Windows loads | Driver or settings possible |
Is the Black Line on Your Laptop Screen Horizontal or Vertical?
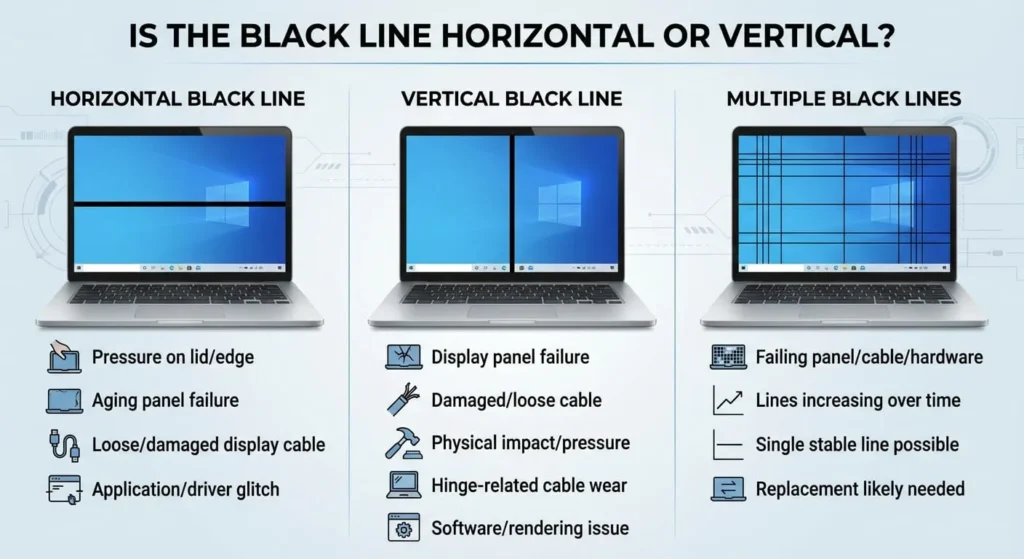
The direction of the line is a genuine clue, not just a cosmetic detail. LCD and OLED panels are built from a grid of rows and columns, so a failure tends to follow that grid pattern.
Horizontal Black Line on Laptop Screen
A horizontal black line on a laptop screen typically follows a row of pixels and may indicate a problem with the display panel or its internal circuitry. Common causes include:
- Pressure applied to the lid, especially near the top or bottom edge
- A panel that is beginning to fail after years of use
- A loose or damaged display cable, especially when the line changes as the laptop lid moves
- Less commonly, a rendering glitch tied to a specific application or driver version
If the horizontal line only appears in one program and disappears elsewhere, check that program’s graphics settings before assuming hardware damage.
Vertical Black Line on Laptop Screen
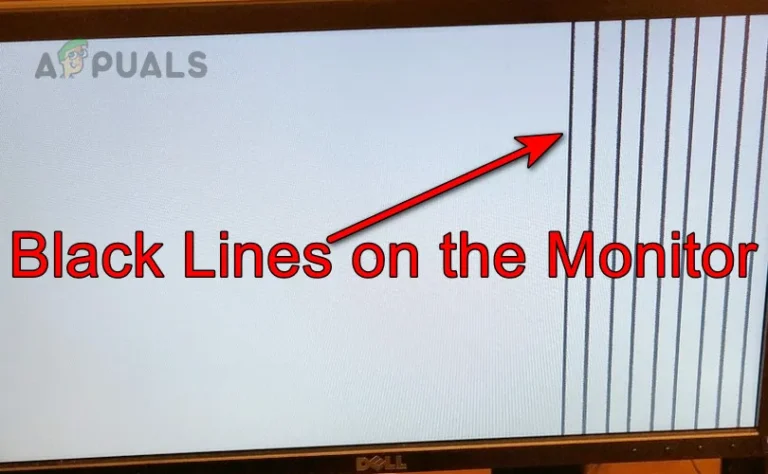
A vertical black line on a laptop screen typically follows a column of pixels and may indicate a problem with the display panel or its internal circuitry. Likely causes include:
- Display panel failure
- Damaged or loose display cable
- Physical impact or pressure
- Hinge-related cable wear
- Software/rendering issue in less common cases
A vertical line that stays fixed in exactly the same position across different screens and applications is more suggestive of a hardware problem, particularly when it also appears in BIOS or UEFI.
Laptop Screen Black Lines Across the Display
When several black lines appear across the display or their number increases over time, the problem is more likely to involve the display panel, cable, or another hardware component than a simple software glitch. A single thin line can sometimes remain stable for a long time. Multiple lines that are increasing in number or moving is a stronger indicator that the panel or its connection is failing and that replacement will likely be needed.
How to Fix Black Lines on Laptop Screen
The right fix depends on what is causing the black line. A temporary graphics glitch may disappear after a restart or driver update, while a damaged display panel or cable usually requires hardware repair.
Try the software fixes first. If the line remains visible in BIOS or continues after Windows troubleshooting, move on to the hardware solutions.
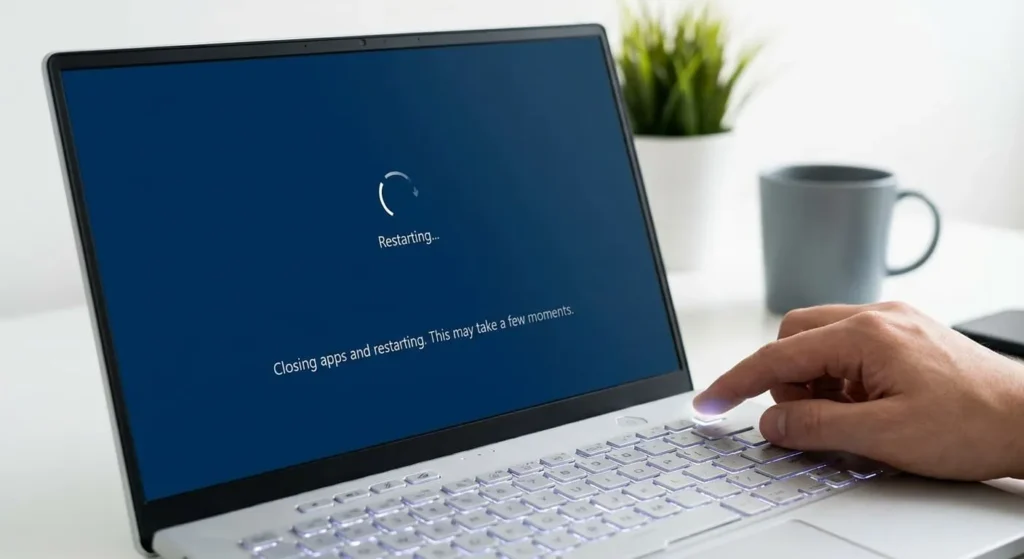
Restart Your Laptop
A simple restart can remove temporary graphics glitches that cause unusual lines or display artifacts. It also reloads the graphics driver and clears temporary system errors.
Save your work, restart the laptop, and check the screen again after Windows loads.
If the black line disappears, it was likely caused by a temporary software or graphics-rendering problem. If it remains in exactly the same position, continue with the steps below.
Update or Reinstall the Graphics Driver
A corrupted or outdated graphics driver can sometimes cause display artifacts, flickering, or abnormal lines.
To update your graphics driver in Windows:
- Right-click the Start button and open Device Manager.
- Expand Display adapters.
- Right-click your graphics adapter.
- Select Update driver.
- Choose Search automatically for drivers.
- Restart your laptop after the installation.
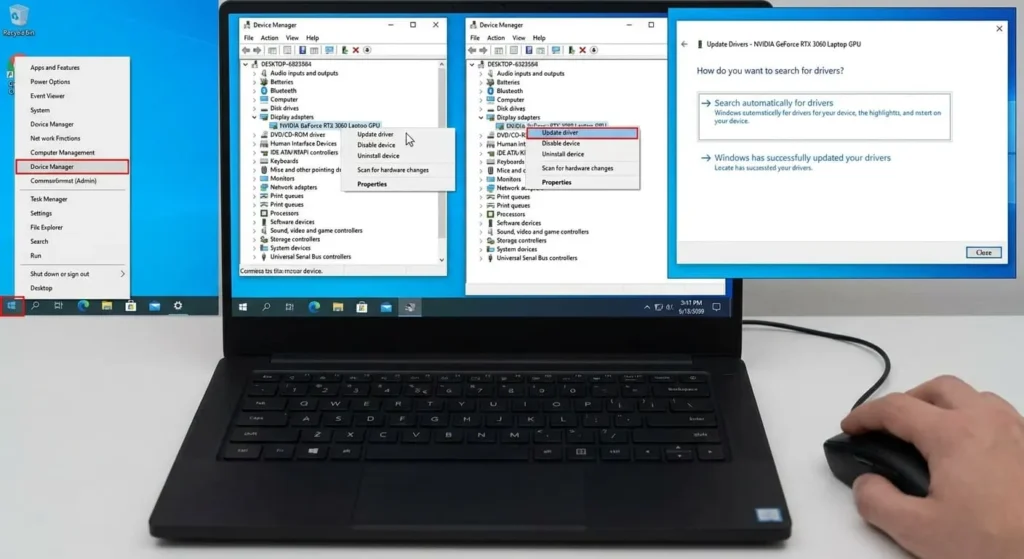
If updating does not help, you can reinstall the driver. In Device Manager, right-click the graphics adapter, choose Uninstall device, and restart the laptop. Windows may reinstall a compatible driver automatically.
For the latest driver, you can also check your laptop manufacturer’s support page or the graphics chip manufacturer’s website.
Roll Back a Recently Updated Graphics Driver
If the black line appeared immediately after a graphics driver update, the new driver may be causing a compatibility problem.
You can try returning to the previous driver:
- Open Device Manager.
- Expand Display adapters.
- Right-click your graphics adapter and select Properties.
- Open the Driver tab.
- Select Roll Back Driver, if the option is available.
- Restart the laptop.
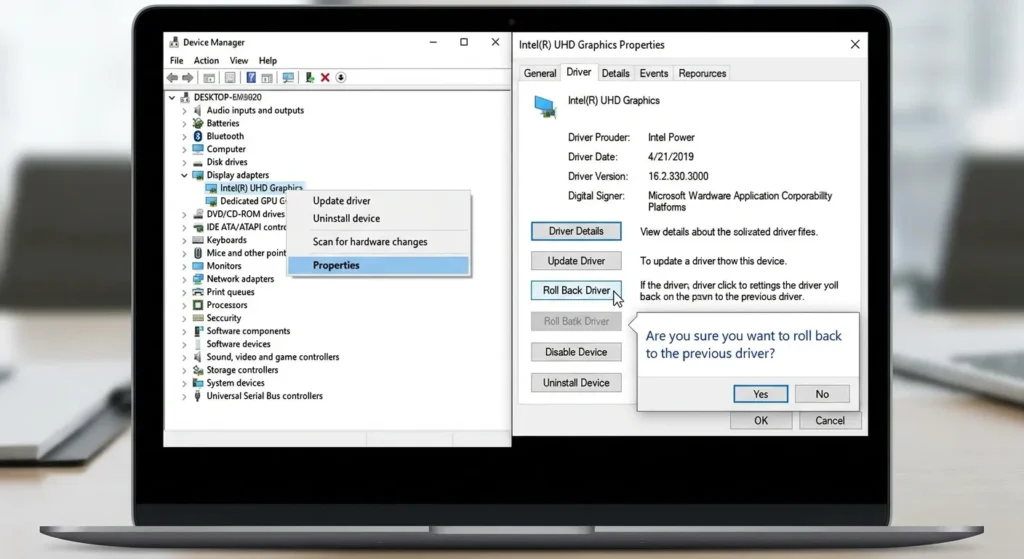
If the Roll Back Driver option is unavailable, Windows may not have retained the previous driver. In that case, check your laptop manufacturer’s support page for an earlier compatible version.
Change the Screen Resolution
An incorrect or unusual display resolution can sometimes cause scaling problems and other display artifacts.
To check the resolution:
- Right-click an empty area of the Windows desktop.
- Select Display settings.
- Find Display resolution.
- Select the option marked Recommended, if available.
- Apply the change and check whether the black line disappears.
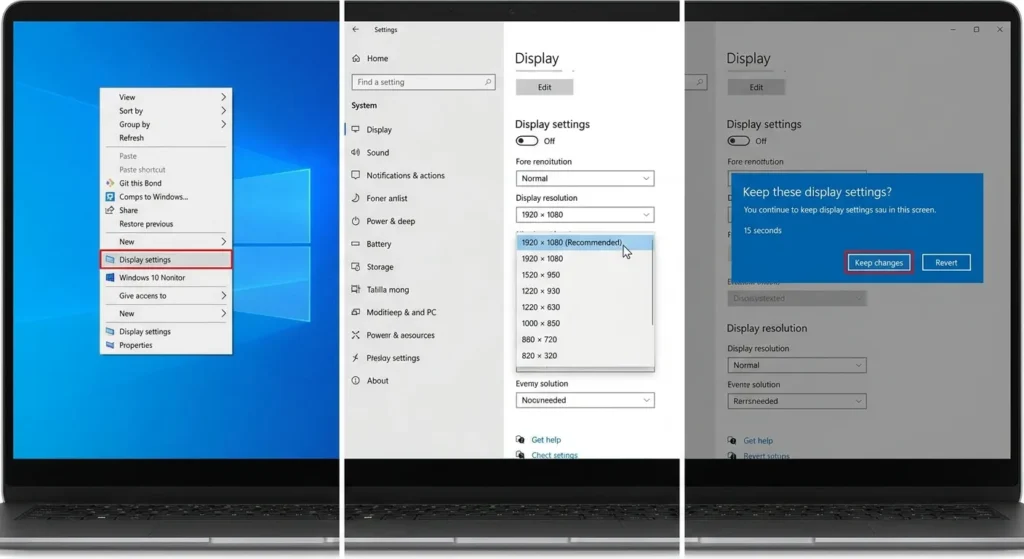
A persistent black line is more commonly related to hardware than resolution settings. However, restoring the recommended resolution is a quick troubleshooting step before moving to hardware repairs.
Change the Refresh Rate
An incompatible refresh-rate setting can cause flickering, instability, or other display problems on some systems.
To change it:
- Open Settings and go to System > Display.
- Select Advanced display.
- Find the Choose a refresh rate option.
- Select the recommended or default refresh rate for your laptop.
- Check the screen again.
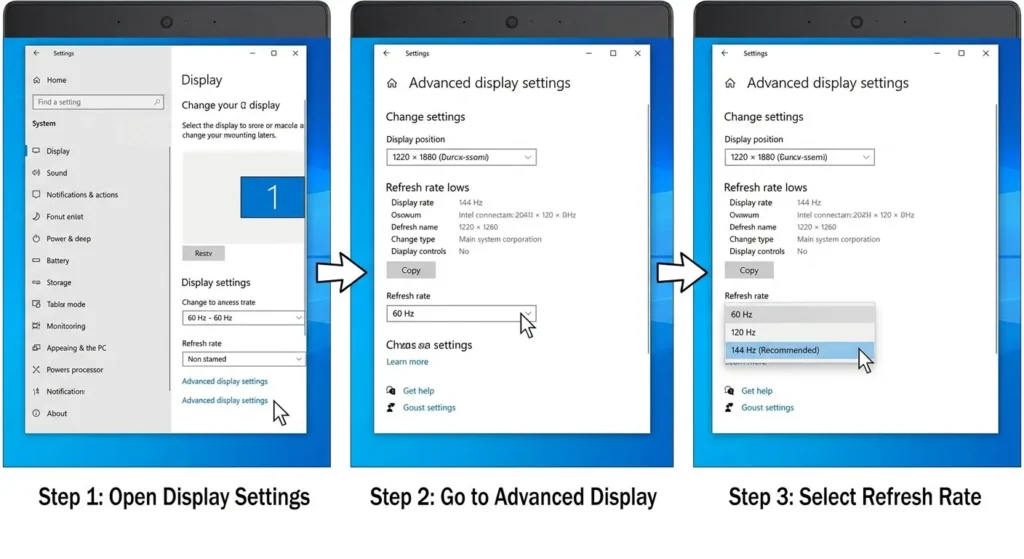
If the black line remains unchanged at different refresh rates, the problem is less likely to be caused by this setting.
Install Pending Windows Updates
Windows updates can include graphics-driver improvements, display compatibility fixes, and other system components that may resolve software-related display problems.
Go to Settings > Windows Update and check for available updates. Install any pending updates and restart your laptop.
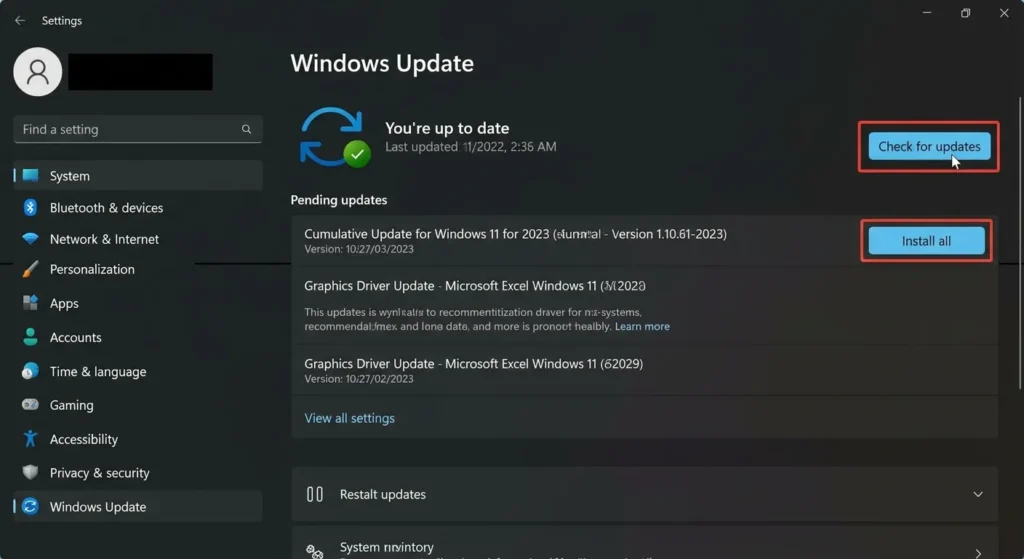
After restarting, check whether the black line is still visible.
If the line appeared before a recent Windows update, however, an update-related driver or compatibility problem may need separate troubleshooting.
Repair or Replace the Display Cable
If software troubleshooting does not remove the black line, the display cable may be loose, damaged, or worn.
The cable runs between the laptop’s motherboard and display panel. Repeatedly opening and closing the lid can put stress on the cable, particularly around the hinge area.
A cable problem becomes more likely if:
- The line changes when you move the laptop lid.
- The screen flickers when the lid is opened or closed. You can use our Screen Flicker Test to check whether the display shows noticeable flickering during normal use.
- The line appears and disappears at different lid angles.
- The laptop was recently dropped or physically damaged.
- An external monitor displays a normal picture.
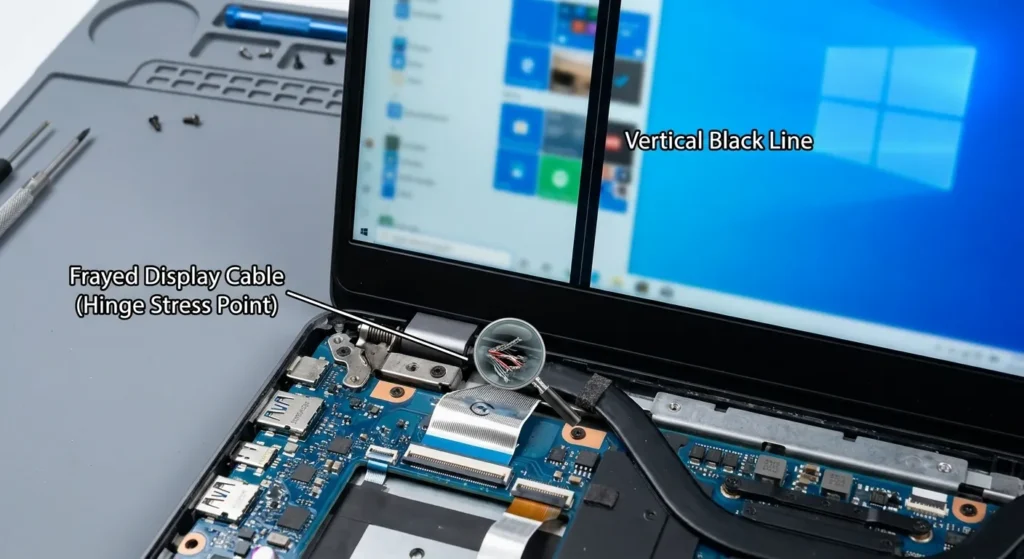
Repairing or replacing an internal display cable requires opening the laptop. If you are not familiar with laptop hardware, it is safer to have a qualified technician inspect the connection rather than pulling or pressing on the screen.
Replace the Laptop Screen
If the black line remains visible in BIOS or during the laptop manufacturer’s built-in display test, the screen panel itself may be damaged.
A damaged LCD or OLED panel can develop permanent black lines because of:
- Broken or damaged pixel rows or columns
- Internal panel damage
- Pressure or impact
- Failed internal display circuitry
- Age-related panel failure
In these cases, software fixes will not remove the line. The practical solution is usually to replace the display panel.
Before buying a replacement screen, confirm the exact laptop model and screen specifications. If your laptop is still under warranty, contact the manufacturer before opening the device or paying for a repair.
Quick rule: If the black line disappears after a restart, driver change, or display-setting adjustment, the problem may be software-related. If it remains in BIOS, does not change after software troubleshooting, or reacts to lid movement, a damaged cable or screen is much more likely.
Black Line on Laptop Screen Dell: Causes and Fixes
If you have a black line on a laptop screen Dell model, the cause can be the same as on other Windows laptops: a damaged LCD panel, loose or damaged display cable, graphics-driver problem, incorrect display settings, or physical damage. Dell also provides a built-in LCD diagnostic that can help determine whether the abnormality is present on the laptop’s internal display before Windows loads.
Run Dell LCD Built-In Self-Test (BIST)
Dell’s LCD Built-In Self-Test (LCD-BIST) is designed to check the laptop’s internal display for abnormalities such as horizontal or vertical lines, distortion, flickering, color problems, and other screen artifacts.
On many Dell laptops, you can run the test as follows:
- Turn off the laptop.
- Disconnect external peripherals.
- Connect the AC adapter.
- Press and hold the D key.
- While holding D, press the Power button.
- Continue holding the key until the LCD-BIST begins.
- Watch the screen as it displays a sequence of solid colors.
- Look closely for the black line, distortion, or other abnormalities.
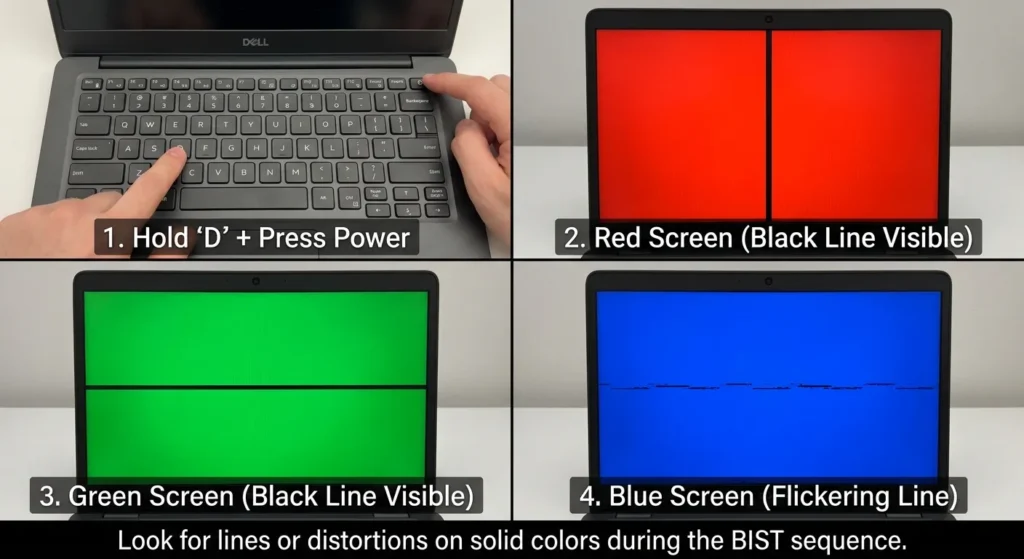
The exact color sequence can vary between display panels, but the purpose is the same: check whether the built-in display itself shows an abnormality during the test.
What the Dell LCD Test Result Means
If the black line appears during the LCD-BIST, that is strong evidence that the problem is associated with the laptop’s display hardware rather than something that only occurs after Windows loads. The next suspects are the LCD panel, display connection, or related display hardware.
If the display looks normal during LCD-BIST but the black line appears after Windows starts, investigate the graphics driver, Windows display settings, GPU-related rendering problems, and recently installed updates before assuming the screen needs replacement.
You can also connect the Dell laptop to an external monitor. If the external display works normally while the laptop’s built-in screen still has the black line, the internal display assembly becomes more likely to be responsible.
For general software troubleshooting, follow the driver, resolution, refresh-rate, and Windows Update steps described earlier in this guide.
Black Line on Laptop Screen HP: Causes and Fixes
A black line on a laptop screen HP model can result from a damaged display panel, display cable or connector problem, physical pressure, graphics-driver issue, or another hardware or software fault. HP provides PC Hardware Diagnostics UEFI, which can run before Windows starts and helps test the computer’s hardware independently of the operating system. For model-specific troubleshooting, HP provides official guidance for display and touchscreen issues, including driver and display troubleshooting.
Run HP PC Hardware Diagnostics
On many HP notebooks, you can access the hardware diagnostics by:
- Turn off the laptop.
- Turn it back on.
- Immediately press Esc repeatedly until the Startup Menu appears.
- Press F2 to open HP PC Hardware Diagnostics UEFI.
- Select the available System Tests, Component Tests, or Symptom Tests, depending on your model.
- Follow the on-screen instructions and review the test results.
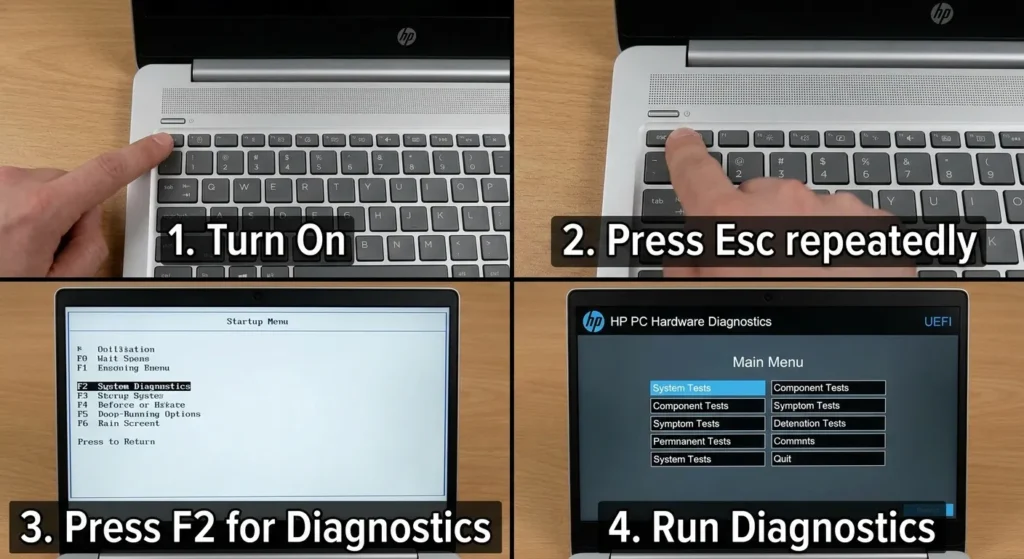
HP notes that the available diagnostic options can vary between systems. Some models also provide symptom-specific tests, while others may show component-level tests through the UEFI diagnostics environment.
If the diagnostic environment shows the same black line or other visible display abnormality before Windows loads, the problem is more likely to involve the display hardware. If the screen looks normal before Windows starts but develops the line after Windows loads, investigate graphics drivers and display settings as well.
Check an External Monitor
Connect the HP laptop to an external monitor or TV using a compatible display connection.
- Internal screen has the line, external monitor is normal: the laptop’s display panel, display cable, or internal display connection becomes more likely.
- Both screens show the same artifact: investigate the graphics driver, GPU, Windows configuration, or another system-level problem.
- Line changes when the lid moves: a display cable or hinge-area connection becomes a stronger possibility.
What About Black Spots on an HP Laptop Screen?
If black spots on a laptop screen HP model appear together with a black line, inspect whether the spots remain fixed in exactly the same physical locations.
A permanent dark spot, especially one that remains visible outside Windows or during hardware diagnostics, can indicate physical LCD panel damage. Pressure, impact, cracked internal layers, or damaged pixels can produce permanent marks that software cannot repair.
If the HP diagnostics report a hardware failure, record the displayed failure ID before contacting HP or a repair technician. HP’s current diagnostic documentation specifically recommends keeping the failure ID for support cases.
Black Lines on Laptop Screen Lenovo: Causes and Fixes
If you see black lines on laptop screen Lenovo models, start by determining whether the problem exists before Windows loads. Common possibilities include LCD panel damage, a loose or damaged display cable, physical impact, graphics-driver problems, and other display hardware faults. For additional model-specific troubleshooting, you can also check Lenovo’s official display and monitor troubleshooting guide.
Check Lenovo BIOS or UEFI Diagnostics
Lenovo laptops use different startup methods depending on the model. Some systems allow you to enter BIOS/UEFI by repeatedly pressing F1 or F2 during startup, while models equipped with a Novo Button can use the Novo menu to access BIOS/UEFI or UEFI Diagnostics.
For a Lenovo model with a Novo Button:
- Turn off the laptop.
- Press the Novo Button.
- Select BIOS Setup or UEFI Diagnostics, if available.
- Check whether the black line is visible before Windows starts.
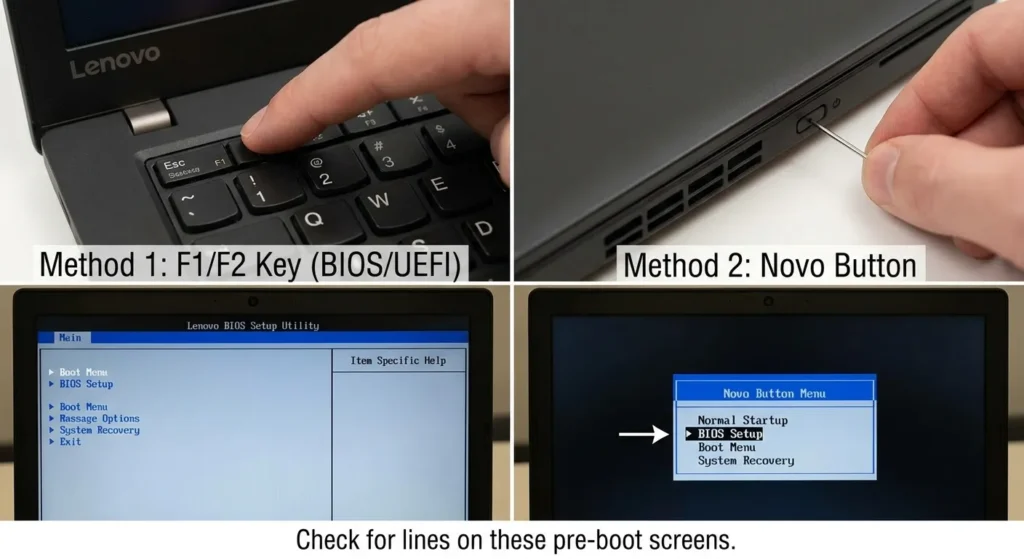
The Novo Button menu is specifically designed to provide access to BIOS/UEFI setup and, on supported models, UEFI diagnostics.
If the black line is already visible in BIOS or Lenovo’s pre-boot diagnostic environment, Windows drivers are unlikely to be the primary cause. This points more strongly toward the LCD panel, display cable, connector, or another hardware component.
Check for a Display Cable or Hinge Problem
A display cable becomes a stronger suspect if the black line changes, disappears, flickers, or becomes more noticeable when the laptop lid is moved.
Do not repeatedly bend or force the display to test this. Simply observe whether normal lid movement changes the symptom. If it does, have the display cable and hinge area inspected by a qualified technician.
Use an External Monitor
An external monitor can help separate an internal display problem from a graphics-system problem.
If the Lenovo laptop produces a clean image on an external display while the built-in screen continues showing black lines, the internal LCD panel or display connection is more likely to be responsible.
If the same black lines appear on both displays, investigate the graphics driver, GPU, Windows display configuration, or another system-level cause.
What Should You Do If the Lenovo Screen Still Has Black Lines?
If the line remains visible in BIOS/UEFI or Lenovo’s pre-boot environment, survives graphics-driver troubleshooting, and does not appear correctly on an external monitor, the next step is generally a hardware inspection.
A technician can check the LCD panel, eDP/display cable, connectors, and hinge area before recommending a complete screen replacement. If the panel itself is damaged, replacing the laptop display is usually the practical solution.
Important: BIOS/UEFI menus, diagnostic tools, and startup keys differ between Lenovo models. Always check the support documentation for your exact model rather than assuming that F1, F2, or the Novo Button will work on every Lenovo laptop.
Quick Brand-Specific Diagnosis
| Laptop brand | Best first diagnostic | What it helps determine |
| Dell | LCD-BIST | Whether the built-in display shows the abnormality before Windows |
| HP | PC Hardware Diagnostics UEFI | Whether available hardware/symptom tests identify a problem |
| Lenovo | BIOS/UEFI or UEFI Diagnostics | Whether the line exists before Windows loads |
These manufacturer-specific tests should be used alongside the general troubleshooting steps above. They help narrow down the problem; they do not always identify the exact failed component by themselves.
Do You Need to Replace the Laptop Screen?
Screen or panel replacement generally becomes the right call once hardware causes have been confirmed through BIOS testing, the external monitor test, and lid movement checks. A few factors are worth weighing before deciding:
- Extent of the damage. A single stable line is a smaller repair than multiple spreading lines or visible cracking.
- Cost versus laptop value. On an older laptop nearing the end of its useful life, the cost of a new panel may approach the value of replacing the laptop outright.
- Warranty status. If the laptop is still under manufacturer warranty and there is no visible physical damage, contacting support before paying for a private repair is usually worthwhile.
- Internal cable versus full panel. In some cases only the display cable needs replacing, which is considerably cheaper than a full panel, though this typically requires a technician to confirm.
If you are not comfortable opening a laptop, a certified repair technician or the manufacturer’s own service option is the safer route, since display cables are thin and easy to damage further during a DIY attempt.
How to Prevent Black Lines on a Laptop Screen
Avoid Pressure on the Display
Keep heavy objects off the closed lid and avoid stacking books or other laptops on top of it. Even moderate, sustained pressure on an LCD or OLED panel can eventually damage the pixels underneath.
Don’t Close the Lid With Objects on the Keyboard
A pen, USB drive, or even a small amount of debris left on the keyboard can press directly into the screen when the lid closes, creating exactly the kind of localized pressure that leads to dead pixel lines.
If you suspect an object caused minor pixel damage, running an online dead pixel test can help you check whether the affected pixels are completely dead or just stuck.
Handle the Laptop Carefully
Avoid carrying the laptop by the screen or lifting it by one corner of the lid, since this puts uneven strain on the hinge and the cable running through it.
Keep the Display Cable From Being Strained
Open and close the lid smoothly rather than forcing it past its natural range of motion, and avoid opening the laptop to an angle beyond what the hinge is designed for.
Keep Graphics Drivers Updated
Installing driver and Windows updates as they become available reduces the chance of software-related rendering glitches that can sometimes be mistaken for the early signs of a hardware problem.
Frequently Asked Questions
Here are some commonly asked FAQs about black link on laptop screen
Final Verdict:
Start by determining whether the black line is caused by software or hardware. Check the screen in BIOS or UEFI, connect an external monitor, take a screenshot, and observe whether the line changes when you move the laptop lid. Together, these tests can quickly narrow down whether the problem involves Windows or the graphics system, the internal display panel, or the display cable.
A line that appears in BIOS or UEFI, remains after graphics-driver troubleshooting, or changes when the lid moves points more strongly toward a hardware problem. On the other hand, a line that appears only after Windows loads and is captured in screenshots is more suggestive of a software or graphics-rendering issue.
Avoid pressing on the screen or opening the laptop unless you have experience with hardware repair. Applying pressure can worsen panel damage, while opening the device can cause additional damage to delicate display cables or affect your warranty.
If the tests point to a damaged cable or display panel, have the laptop inspected by a qualified technician. Screen or cable replacement is usually the practical solution when the line is permanent, spreading, or accompanied by multiple lines or visible damage.
Also Red: Laptop Touchpad Not Working? 12 Easy Ways to Fix It in Windows 10 & 11