Black Line on Monitor: Causes and How to Fix It
Seeing a black line on a monitor is an immediate cause for concern. Whether you are dealing with a thin vertical stripe or a thick horizontal block, a black line can indicate a communication failure between your computer and the display. It can also indicate a physical hardware fault.
However, a screen line does not automatically mean the display is permanently broken. The problem often stems from a loose connection, an outdated graphics driver, or an incorrect display setting. Because the cause can range from a simple software issue to permanent panel damage, finding the exact source is the first important step. This guide will help you diagnose the problem, explain what causes a black line on a computer screen, and provide practical troubleshooting steps to fix the issue efficiently.
If it’s your laptop’s built-in display rather than an external monitor, the internal causes and fixes differ slightly. See our guide on a black line on a laptop screen instead.
Quick Answer: Why Is There a Black Line on My Monitor?
Most black lines come from a few common causes. Finding the cause usually takes only a few minutes. You can use the same basic checks as an expert technician.
- A loose or damaged video cable can cause a line-shaped display problem. A faulty monitor or PC port can also cause it.
- An incorrect resolution or refresh rate can distort part of the image. This can create a line-like visual artifact.
- A graphics driver problem can send corrupted signal data to the display. A failing GPU can cause the same issue. The line may appear fixed or flickering.
- A line that stays in the same spot often points to hardware damage. The display panel may be damaged. Internal parts, such as a ribbon cable or T-Con board, may also be faulty.
- Connect the monitor to another device to test it. You can also connect another display to your computer. These tests can quickly show which part is causing the problem.
Is the Black Line Caused by the Monitor or the Computer?
The same line can come from six completely different sources, and guessing which one wastes more time than just running through the checks below.
Check the Monitor’s Built-In Menu
Every monitor has an on-screen display (OSD) menu, usually accessed with a physical button on the bezel. Open it and look closely at whether the black line runs through the menu itself. If the line appears inside the OSD, the monitor is likely causing the problem internally. This points to the panel, internal electronics, or a loose connection inside the monitor. The computer is less likely to be the cause.
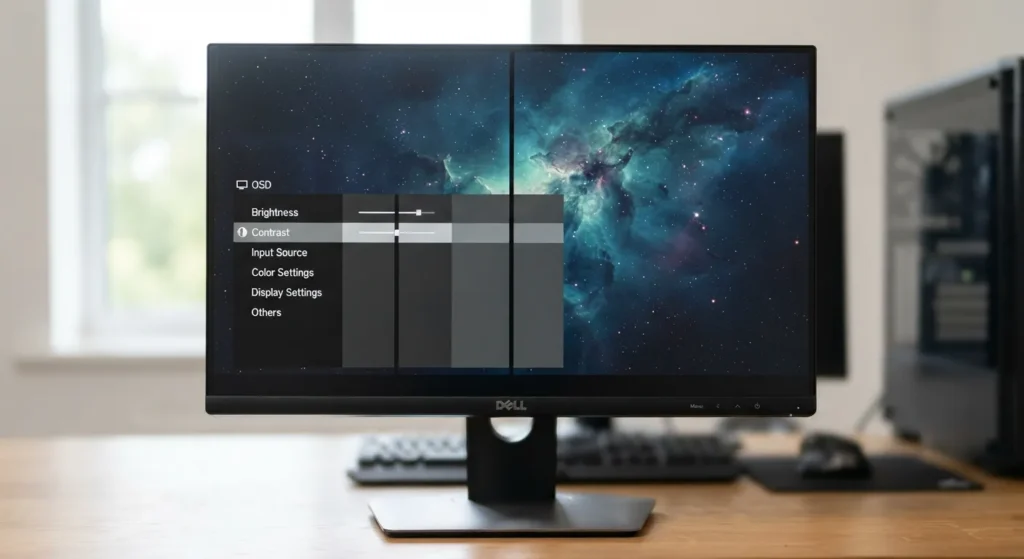
If the line stops at the menu’s edge, the computer signal is more likely responsible. The same applies if the line does not appear inside the OSD at all.
Check the Line During Startup or BIOS
Restart the computer and watch the manufacturer’s logo as it appears, then continue into the BIOS or UEFI screen before Windows loads. The motherboard and monitor control both screens. Windows and the graphics driver do not. If the black line appears on the boot logo or BIOS screen, Windows is not the cause because it has not started yet. This narrows the problem down to the cable, the port, the GPU, or the monitor’s own hardware.
Take a Screenshot
Capture the area of the screen where the line appears and save the image, then view it on another device if possible. If the black line appears in the screenshot, the problem affects the image itself. This usually points to a software, driver, or GPU rendering issue. If the screenshot looks completely clean, but the line remains visible on the physical screen, the problem occurs after the image leaves the computer. The issue is likely somewhere between the cable and the display panel.
Connect Another Monitor
Plug a different monitor into the same cable and port your original monitor was using. If the black line does not appear on the second monitor, the original monitor is likely causing the problem. The computer or GPU is less likely to be the cause.
If the same line appears on the second monitor, the graphics card, cable, or computer port becomes more likely to be the cause.
Connect the Monitor to Another Computer
Take the affected monitor and connect it to a different computer or laptop, ideally using a different cable if one is available. If the line disappears, the original computer, GPU, or cable was responsible. If the black line follows the monitor to another computer, the monitor is likely the problem. This is even more likely if you also used a different cable.
Run a Monitor Self-Test or Screen Test
Most monitors have a built-in self-test mode. It shows a test pattern without a computer signal. You can usually start it by holding a menu button while turning on the monitor with no cable connected. If your monitor does not have a self-test, you can get a similar result with full-screen solid colors. Display black, white, red, green, and blue screens one at a time. Check whether the line appears in the same position on every color.
A line that appears across every solid color is strong evidence of a hardware problem. The same applies if it appears during a self-test with no signal connected. This points to an internal monitor problem rather than Windows, the graphics driver, or the graphics card.
Test Your Screen Right Now: Our Screen Test Tool displays full-screen solid colors, gradients, and pixel patterns directly in your browser, so you can check for lines, dead pixels, and stuck pixels without installing anything. Run through each color and note whether the line stays in the same position every time.
What Does the Black Line on Your Monitor Look Like?
The appearance of a black line often narrows down the likely cause before you even open a menu or run a test. Compare what you’re seeing to the table below.
| Visual symptom | What it may indicate |
|---|---|
| Single vertical line | Panel, ribbon cable, or internal display connection |
| Multiple vertical lines | Panel, T-Con board, ribbon cable, or display electronics |
| Single horizontal line | Panel, cable, signal, or internal hardware |
| Multiple horizontal lines | Signal, GPU, cable, or panel problem |
| Small black line | Localized pixel or panel problem |
| Line that flickers | Cable, refresh rate, GPU, or panel issue |
| Line that appears everywhere | Monitor hardware becomes more likely |
| Line visible only in Windows | Driver or software issue is possible |
Black Vertical Lines on Monitor
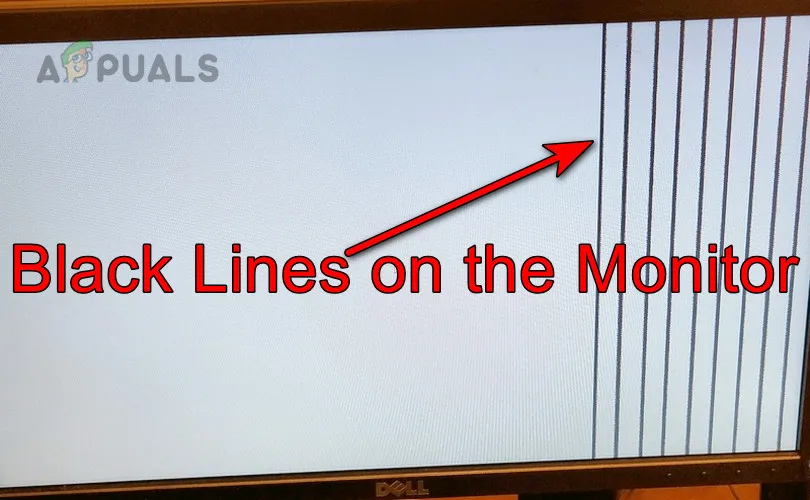
Vertical lines run from the top of the screen to the bottom, or partway down, and they tend to point toward panel-level or internal cabling issues more often than horizontal lines do.
A single vertical line, especially one that runs the full height of the screen, often points to a panel hardware fault. This is more likely when the line stays in the same pixel column, regardless of what appears on the screen. The cause may be a break or short in the panel’s internal wiring. A failed pixel column can also cause it.
Multiple vertical lines, especially when evenly spaced or grouped together, often indicate a problem with the panel’s driver circuit or ribbon cable.
Whether a line runs the full height of the screen or only part of it matters too. A full-height line usually points to a hardware problem inside the monitor. It affects the entire column. A partial-height line may come from a loose connector or a cable with poor contact.
A persistent vertical line that never changes position, brightness, or behavior is more likely to be a hardware issue. A line that comes and goes often points to a loose connection. This is especially likely if the line changes when you move the cable, gently tap the monitor, or change the viewing angle.
What Is a T-Con Board?
T-Con stands for Timing Control board. It is a small circuit board inside most LCD and LED monitors. The main function of this board is to converts image data from the video source into signals that the display panel can use. It controls the timing and voltage that drive each row and column of pixels.
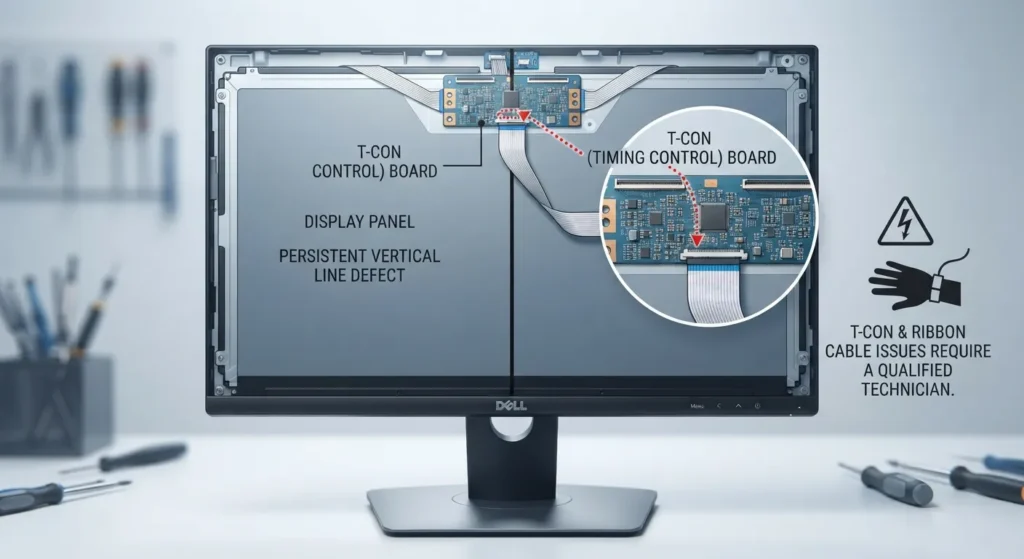
A faulty T-Con board or loose ribbon cable can cause a persistent line or band. The line may stay the same across different devices and content. This is one of the reasons a line that survives a monitor self-test with no cable connected points toward internal monitor hardware rather than anything on the computer side.
T-Con and ribbon cable issues aren’t something to open the monitor and attempt to fix yourself. Monitors can hold an electrical charge even when unplugged. Their internal parts are also delicate and model-specific. A qualified technician should handle this type of repair.
Horizontal Black Lines on Monitor
Horizontal lines run from left to right. They can have the same causes as vertical lines, but signal or refresh rate problems cause horizontal artifacts more often.
A single horizontal line that stays fixed in one place can point to a similar problem as a single vertical line. The cause may be the display panel, a faulty cable, or an internal connection. Multiple horizontal lines, especially when they appear evenly spaced or shift position, often point to a signal problem. The issue may come from the cable, port, or GPU video output.
A line that spans the full width of the screen is generally more consistent with a hardware or signal-level cause, since it affects every pixel in that row at once. A line confined to part of the width is sometimes linked to a localized connector or panel fault instead.
Some horizontal lines only appear at specific refresh rates. If the line appears at 144 Hz but disappears at 60 Hz, the monitor may struggle with the higher refresh rate. The cable may also lack enough bandwidth to support 144 Hz.
Small Black Line on Monitor
A small black line is usually easier to overlook at first, but the same diagnostic logic still applies.
A thin, one-pixel line is often the first sign of a developing panel issue, though it can also come from a single stuck or dead pixel that happens to align with others nearby. A short, localized line that only covers part of the screen, rather than running edge to edge, is more consistent with a small panel defect or a minor connector issue than a full cable or GPU problem.
It helps to understand the difference between a small line and a dead pixel. A dead pixel is a single point that stays black regardless of what color is displayed around it. A stuck pixel is similar but shows a fixed color, such as red or green, instead of black. A small black line, by contrast, usually affects a row or column of pixels together, creating a visible line rather than a single dot.
To test whether a small line is pixel-related, run the same solid-color test described earlier. A dead pixel or a genuine pixel-row defect stays black on every color, including white. If the mark changes color, moves, or disappears on certain colors, the issue is more likely related to the signal than a permanent pixel failure.
Common Causes of a Black Line on a Monitor
A black line on a monitor can come from a simple connection issue or a failing display component. These are the most common causes and what each one means.
Loose or Damaged Display Cable or Monitor Port
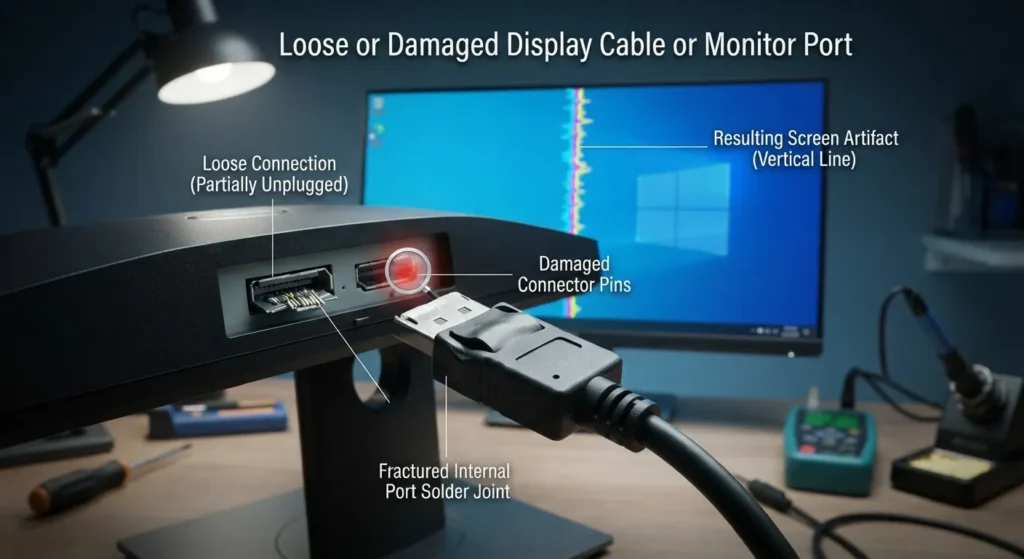
HDMI, DisplayPort, DVI, and USB-C cables all carry the video signal between the computer and the monitor, and any of them can develop a fault that shows up as a line. A loose cable, bent connector pin, or damaged wire can interrupt part of the signal. This may create a line on the screen instead of causing a complete loss of the display.
The port itself, on either the monitor or the graphics card, can also be at fault. A loose internal solder joint or a misaligned port can cause the same symptoms as a bad cable. Reseat the connection and test a different cable and port. These steps are covered in the fixes section below. They can help confirm whether the connection is causing the problem.
Incorrect Resolution
Every monitor has a native resolution that matches the physical number of pixels on its panel. An unsupported or incorrect resolution can cause visual artifacts. The wrong resolution can create line-like distortions when it does not match the panel’s native resolution.
This is more common after connecting a new monitor, changing a cable type, or switching between graphics outputs, since Windows doesn’t always detect the correct native resolution automatically. Matching the display to its recommended resolution, covered in the fixes section, resolves this cause when it applies.
Incorrect Refresh Rate
Refresh rate determines how many times the display updates each second. It must be compatible with both the monitor and the cable. A refresh rate that is too high for either one can cause dropped frames or visible line artifacts. This is more common on monitors that run above 60 Hz.
If a black line only appears at a specific refresh rate, or gets worse as the refresh rate increases, that’s a strong signal this is the cause rather than a hardware fault. Testing at 60 Hz, which nearly every monitor and cable can handle reliably, helps confirm whether refresh rate is involved.
Graphics Driver Problems
The graphics driver lets Windows communicate with your GPU. An outdated, corrupted, or incorrect driver can cause display problems, including lines on the screen. This is especially common after a Windows or driver update. Either update can sometimes create a conflict with the existing installation.
A driver problem is more likely if the black line appears only in Windows. It is less likely to be a driver issue if the line also appears in the BIOS, boot logo, or monitor self-test. These screens do not rely on the Windows graphics driver.
GPU or Graphics Card Problems
A failing or overheating GPU can send corrupted signal data to the monitor. This can cause display artifacts, including black lines. The problem may become more noticeable during heavy use, such as gaming or video playback. This is different from a driver problem, since it originates in the hardware itself rather than the software controlling it.
To isolate the GPU, test it with another monitor. You can also connect the same monitor to another computer. Compare the results to find the source of the problem.
Monitor Panel Damage
Physical impact, pressure applied to the screen, or a drop can crack the display panel or damage the delicate layers underneath the glass, and the result is very often a line or a cluster of lines rather than a shattered appearance. Pressure damage in particular can produce a line without any visible crack on the surface, since the damage happens to internal layers rather than the outer glass.
Panel damage is permanent and cannot be fixed with software, drivers, or cables. If a line appears after a drop, impact, or pressure, panel damage is the most likely cause.
Internal Monitor Hardware Problems
Beyond the panel itself, several internal components can produce a persistent line if they fail or develop a loose connection. This includes the ribbon cable connecting the panel to the rest of the monitor’s electronics, the T-Con board covered earlier, and other display control circuitry inside the housing.
These faults typically produce a line that appears consistently across every input, every connected device, and the monitor’s own self-test, since the problem exists before the signal even reaches the panel’s external inputs.
Dead Pixels or Failed Pixel Rows/Columns
A dead pixel is a single pixel that no longer lights up correctly and stays a fixed color, usually black, regardless of what’s being displayed. When an entire row or column of pixels fails together, rather than a single isolated point, the result looks like a continuous line instead of a dot.
Failed pixel rows or columns are a hardware-level fault in the panel itself and can’t be repaired through software. Depending on the monitor’s warranty terms, a certain number of dead or stuck pixels may qualify for a replacement, which is worth checking before assuming a repair is the only option.
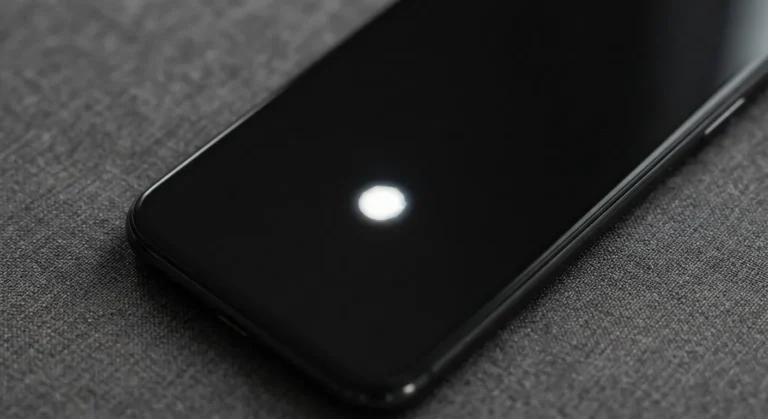
On phone screens, this same kind of panel-level fault often shows up differently, appearing as a bright spot rather than a black line, especially on OLED displays.
How to Fix Black Lines on Monitor
Start with the simplest checks and work your way up to advanced fixes. Follow the steps in order instead of jumping straight to driver reinstalls or a factory reset.
1. Restart the Computer and Monitor
A full restart, rather than putting the computer to sleep, clears temporary display glitches and forces both the GPU and the monitor to reinitialize their connection.
Power off the computer completely, then turn off the monitor and unplug it from power for about 30 seconds before plugging it back in. This briefly resets the monitor’s internal electronics, not just its display output. Turn the monitor back on first, then start the computer, and check whether the line is still present.
This fix works well for temporary glitches but does nothing for a hardware fault. If the problem persists after restarting, move on to the next step.
2. Reconnect the Display Cable
A cable that looks fully connected isn’t always making solid contact, and reseating it is one of the fastest checks available.
Disconnect the video cable from both the monitor and the computer, then inspect both connectors for bent pins, corrosion, or visible damage before reconnecting. Push each end in firmly until it clicks or seats fully, and if your cable uses screws, such as some DVI connectors, tighten them.
If the line disappears or changes after reconnecting, a loose connection was likely the cause. If nothing changes, the cable itself or the ports may be at fault, which the next fix addresses directly.
3. Try a Different Display Cable
Cables can fail more often than you might expect. Sharp bends, tight pinching, and long-term use can gradually damage the cable and affect its performance.
Swap in a different HDMI, DisplayPort, DVI, or USB-C cable, matching the same connection type your monitor and GPU already support. Make sure the replacement cable supports the resolution and refresh rate you are using. A cable designed for 1080p at 60 Hz may not reliably handle a 4K or high-refresh-rate signal.
If the black line disappears with a different cable, the original cable was the cause. If the same line appears with a known-good cable, the problem is more likely at the port level or further upstream.
4. Try a Different Monitor or GPU Port
Most GPUs have more than one video output, and most monitors have more than one input, so testing an alternate port helps rule out a single faulty connection point.
Switch the monitor to a different input on its own OSD menu, such as moving from HDMI to DisplayPort if both are available, and connect to a different output port on the graphics card as well. Compare whether the black line changes, moves, or disappears with each combination.
A line that follows a specific port, regardless of which cable or monitor is connected to it, points to a fault in that particular port rather than the cable or the display.
5. Set the Monitor to Its Native Resolution
Running a resolution the panel wasn’t designed for can create scaling artifacts that resemble a line, particularly near the edges of the screen.
Open Display settings in Windows, either by right-clicking the desktop and selecting Display settings, or through Settings, System, Display. Find the Display resolution option and choose the one marked Recommended, which matches your monitor’s native resolution in almost all cases. Microsoft’s guide on changing your screen resolution walks through the exact menu steps if you need a visual reference.
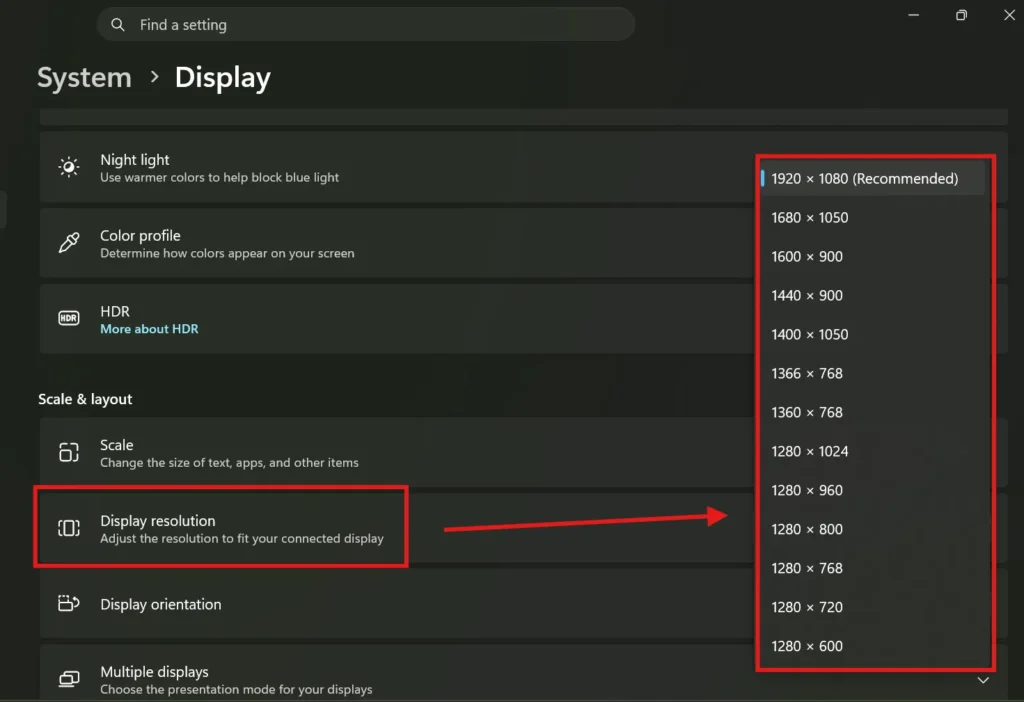
If the line was tied to an incorrect resolution, it should disappear immediately after switching. If the recommended option isn’t available or the issue continues, a driver problem may be preventing Windows from detecting the correct resolution.
6. Change the Refresh Rate
An unsupported or borderline refresh rate can introduce visual artifacts that a lower, more stable refresh rate doesn’t.
In the same Display settings menu, look for Advanced display settings and adjust the refresh rate down to 60 Hz. On Windows 11, this option usually sits directly under Advanced display settings. On Windows 10, you may need to open Display adapter properties from that same menu to find the refresh rate dropdown. Check whether the black line disappears or changes at the lower rate.
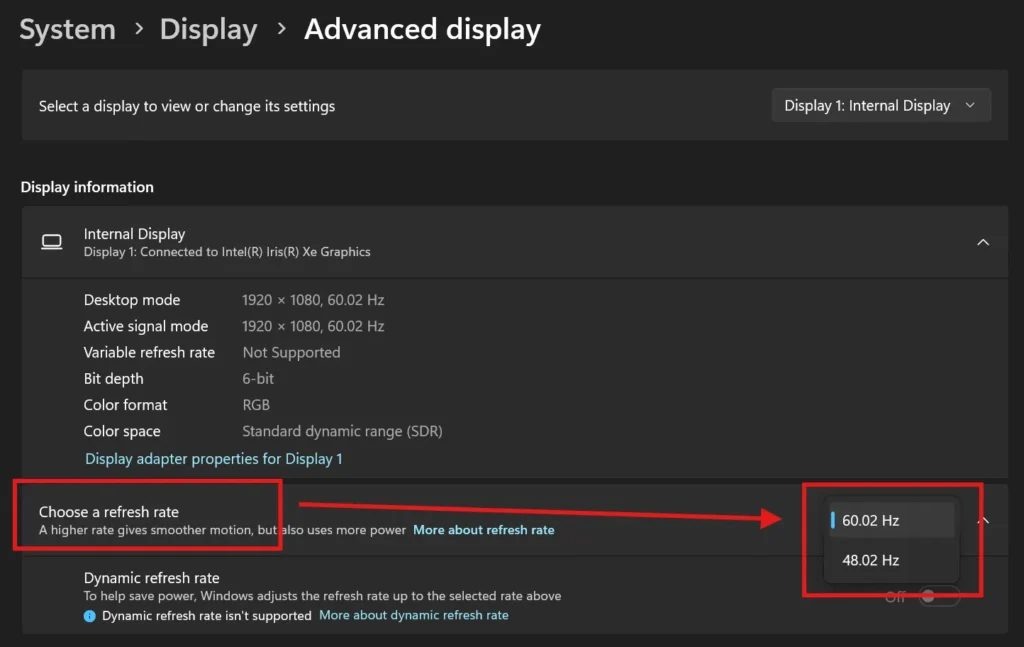
If 60 Hz resolves the issue, the original refresh rate may be too demanding for your current cable or monitor. If you need the higher refresh rate for gaming or other use, try a different cable rated for that bandwidth, described in fix three, before permanently settling on 60 Hz.
7. Update the Graphics Driver
Outdated or missing driver features can sometimes affect how signal data is processed before it reaches the monitor, and updating to the latest official driver often resolves this.
Depending on your GPU, download the latest driver directly from NVIDIA, AMD, or Intel’s official driver support pages, or check for optional driver updates through Device Manager in Windows. Install the update, restart the computer, and check the display again.
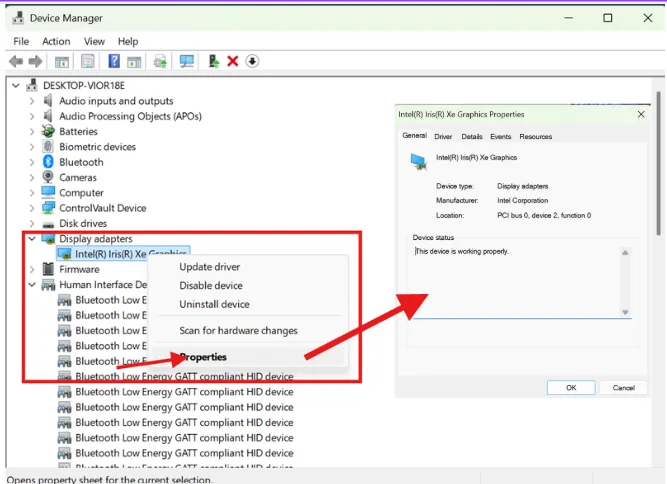
If updating doesn’t help, or if the line appeared shortly after a recent driver update, rolling back or reinstalling the driver, covered next, is usually the more effective option.
8. Reinstall or Roll Back the Graphics Driver
When a specific driver version is the source of the problem, a clean reinstall often works better than installing another update on top of it.
A clean installation removes all existing driver files before installing a fresh copy, which avoids leftover files from a previous version causing conflicts. Display Driver Uninstaller, commonly called DDU, is a popular third-party tool designed for this purpose. It is best to run DDU in Windows Safe Mode because the graphics driver is not actively running there. This allows DDU to remove the driver more thoroughly before you install the latest driver from the manufacturer.
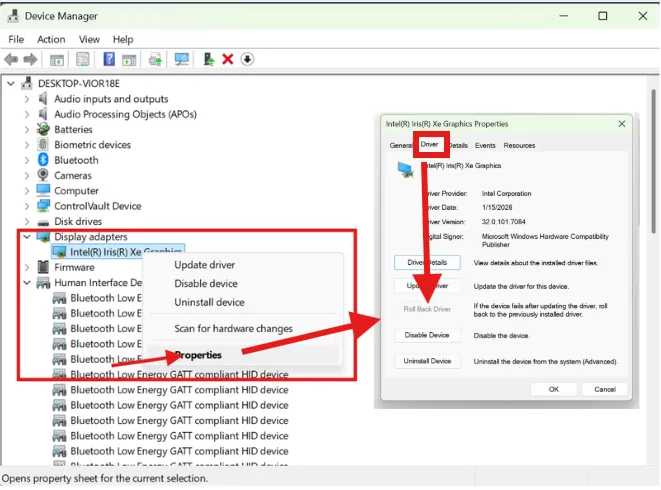
My Top Tip: Before running Display Driver Uninstaller, write down or screenshot your current driver version and GPU model. If a fresh reinstall doesn’t help, you can quickly identify whether you need to roll back to that exact earlier version instead of guessing.
Rolling back to a previous driver version instead of updating makes sense when the black line appears immediately after a driver update and a fresh install of the same updated version doesn’t resolve it. This can be done through Device Manager by selecting the graphics card, opening Properties, and using the Roll Back Driver option if it’s available.
Depending on your laptop model, some manufacturers customize their graphics drivers, so downloading a generic driver directly from NVIDIA, AMD, or Intel instead of the manufacturer’s own version can occasionally introduce new conflicts on certain systems.
9. Reset the Monitor to Factory Settings
Monitor settings, including custom color profiles, scaling options, or OSD adjustments, can sometimes contribute to display artifacts, and a factory reset clears all of them at once.
Open the monitor’s OSD menu using its physical buttons and look for a factory reset or default settings option, usually found under a general or system submenu. Depending on your monitor’s manufacturer, such as Samsung, LG, Dell, or Acer, this option may be labeled differently, such as Factory Reset, Initialize, or Reset All.
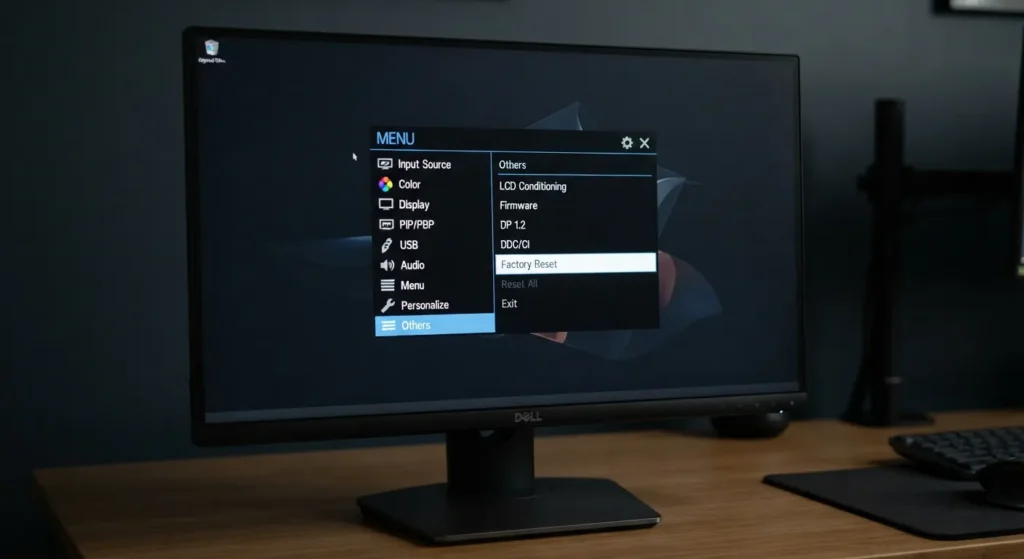
After resetting, check the display again. If the line was tied to a custom setting, it should be gone. If it persists after a factory reset, the cause is more likely a cable, signal, or hardware issue rather than anything configurable in the monitor’s menu.
10. Test the Monitor With Another Computer
This fix mirrors the diagnostic step covered earlier, and it’s worth repeating here as an active troubleshooting step rather than just a diagnostic check.
Connect the monitor to a different computer or laptop, ideally with a cable you know is working correctly. Check whether the black line is present on the new setup.
If the line disappears, the original computer, its GPU, or its cable was responsible, and the fixes above targeting the computer side are worth revisiting. If the line remains on the new computer, the monitor itself is the most likely source, which shifts focus toward the warranty or repair options covered later in this guide.
11. Check for Physical Damage
A visual inspection can sometimes reveal the cause of a line when other fixes have not worked. This is especially useful if the monitor was recently moved, dropped, or bumped.
Look closely at the screen surface for cracks, and check for pressure marks or discoloration that might indicate an impact even without a visible crack. Inspect the monitor’s frame and the areas around each port for looseness or damage. Avoid pressing or squeezing the display panel itself while checking, since applying pressure can make existing damage worse.
If physical damage is visible, or the timing lines up with a drop or impact, the line is very likely a hardware fault rather than something further troubleshooting will resolve.
Can a Black Line on a Monitor Be Fixed?
Yes, sometimes. The right fix depends on whether the black line is caused by a cable, connection, software issue, or damaged display panel.
Problems You Can Often Fix Yourself
- A loose cable
- A faulty or damaged cable
- An incorrect resolution
- An incorrect refresh rate
- A driver problem
- An incorrect input or port selection
These causes typically respond to the fixes covered above without needing any tools or professional help.
Problems That May Require Professional Repair
- Internal ribbon cable failure
- T-Con or control-board problems
- Damaged ports
- Internal electronics failure
These issues involve components that are not designed for average users to access or replace. Trying to repair them without the proper tools or experience can cause further damage to the monitor.
Problems That May Require Panel Replacement
- Permanent panel damage from impact or pressure
- Physical cracks in the screen
- Failed display rows or columns
- A line that persists during the monitor’s own self-test with nothing connected
When a line survives a self-test with no computer attached, that’s one of the clearest signs the panel itself, rather than anything external, is at fault.
Repair or Replace the Monitor?
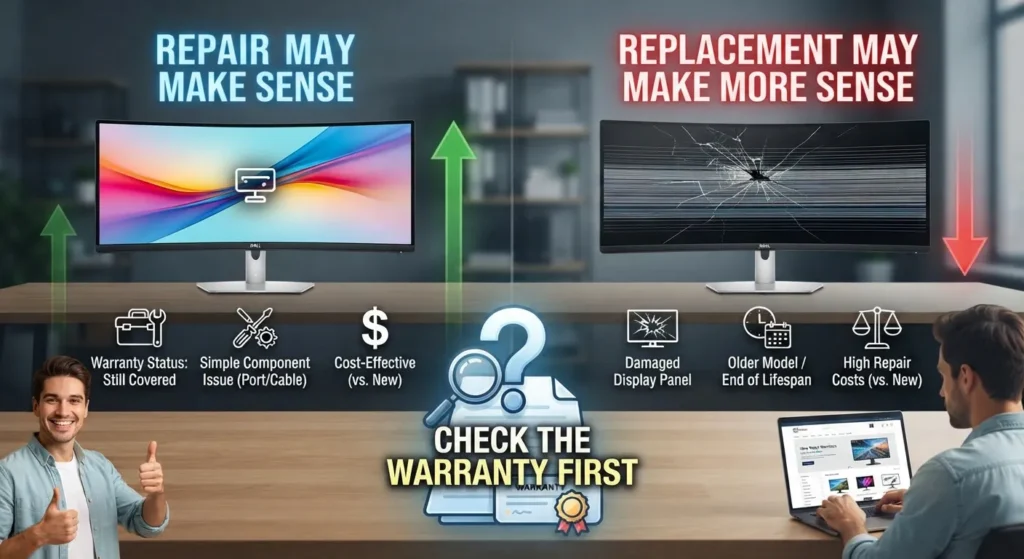
Repair May Make Sense When
- The monitor is a higher-end or expensive model.
- It’s still covered under warranty.
- The issue involves a cable, port, or other easily repairable component.
- The repair cost is reasonable compared to buying a new monitor.
Replacement May Make More Sense When
- The display panel itself is damaged.
- The monitor is older and nearing the end of its typical lifespan.
- Repair costs are close to what a comparable new monitor would cost.
- Multiple display problems are developing at once, suggesting broader hardware decline.
Check the Warranty First
Before deciding between repair and replacement, check what coverage is already available. Manufacturer warranties typically cover hardware defects for a set period, while some retailers offer their own extended coverage on top of that. If the monitor was purchased with accidental damage protection, physical damage from a drop or impact may also be covered. Reviewing the warranty terms first can mean the difference between a free repair or replacement and an out-of-pocket cost.
When to Get Professional Monitor Repair
Consider getting a professional tech to take a look when any of the following apply:
- The line remains after working through the troubleshooting steps above.
- The monitor fails its own self-test with no computer connected.
- The display panel shows visible physical damage.
- Internal hardware, such as a ribbon cable or T-Con board, is suspected based on the symptoms.
- Multiple lines are appearing or spreading across the screen over time.
- There are signs of electrical damage, such as unusual smells, discoloration, or the monitor failing to power on consistently.
Frequently Asked Questions
Here are some most common questions about black line on monitor issue.
Conclusion
Most cases of a black line on a monitor can be fixed by checking a few common causes. These include a loose or damaged cable, an incorrect resolution or refresh rate, an outdated graphics driver, or a fault in the monitor’s internal hardware.
Start with the cable, port, resolution, and driver checks covered in this guide, since they resolve the majority of cases without any cost. Using another computer or monitor helps isolate exactly where the problem sits if the simple fixes don’t work.
A line that remains during the monitor’s own self-test, with nothing connected, points to a hardware problem. If physical panel damage is confirmed, professional repair or monitor replacement is usually the more practical option.